In this article we want to show how aAdd logo to Photo, logo that can be both corporate and personal. Adding a logo (like adding a text watermark) is an effective way not only for protect your digital photos online, but also for promote your brand. Basically, you kill two birds with one stone!
Whether you are an amateur or professional photographer, in this guide you will find out how add logo on multiple photos at the same time, and with very good results. You don't need expensive or complex software (such as PhotoShop) to watermark an image and / or add logo on photo in a professional way. There is nothing wrong with using professional photo editing software like Photoshop but here we want to point out a much more practical and accessible application to do the same job.
Among the many programs in circulation, able to add logos on photos (even in multiple and contemporary modes) we have selected one that in our opinion turns out to be an excellent compromise between ease of use, quality and cost. We are talking about NEVER Watermark, software available for Windows PC. You can download the free version to understand how it works and the potential.
How to Add Logo on Multiple Photos Simultaneously with 123 Watermark
NEVER Watermark is one of the best programs to add watermarks to photos (both textual watermarks and real logos).
Let's see in detail how this watermark software works for put logo on multiple photos in a single click.
Step 1. To get started you need to download and install 123 Watermark on your Windows computer

After installation this initial interface will open:

Step 2. Import the photos on which you want to add the logo
Click on the "Add Images”To start selecting photos from your computer, photos on which you want to insert your logo. After importing the photos you will see the list on the left and the preview in the central screen of the program.

Step 3. Create and add the logo to your photos
To quickly add a logo to your photos you can click on the template at the bottom "Logo Image". Once this is done, the 123 Watermark logo will appear on the photo. Now from the Watermark Options tab of the program you can customize the logo by uploading your own (from the “Image” section).
After you upload your logo image you can place it on the photo wherever you want. You can also set its size and define a transparency.
If you want, you can also try applying the effect "Survey"Which offers a result like the one you can see from the following figure:

Step 4. Export the photos with the logo
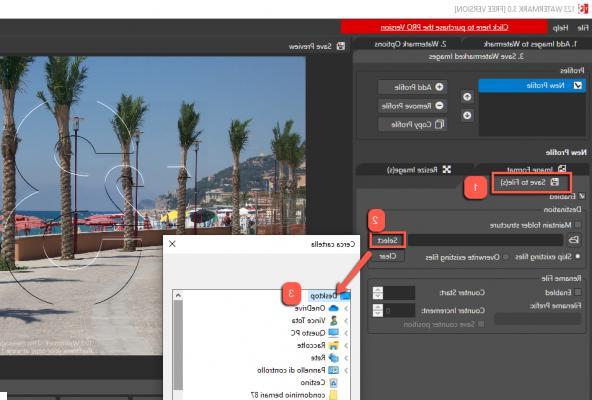
To save the photos with the logo, simply access the tab SAVE IN FAVORITES, click on “Save to File (s) and choose a destination folder, as shown in the following figure:

Once this is done click on APPLY WATERMARK at the bottom right to save the logo photos in the set folder.
With a few steps you can add logos on as many photos as you want, even if they are tens, hundreds or thousands!
Is there a version of the software for the XP Ptofessional operating system?
-
It should already be compatible with Windows XP as well


