Connect an Android phone to the computer

If you want to connect one Android smartphone to your computer via cable, you will be happy to know that the procedure is really simple. In the next few lines, I will show you some operations you can perform, whether you have a computer with a Windows operating system or a Mac.
Windows
If you use a computer with a Windows operating system, you will almost certainly not need to use additional software for connect an Android smartphone. In fact, when you connect the device to the PC via USB cable, Windows will begin to identify it, automatically installing its drivers (which, if necessary, will be downloaded from the Internet).
This way, you will be able to use simply Explore Fillet Windows to browse the folders and files in the memory of your Android smartphone. However, before addressing this procedure in detail, it is necessary to give you a brief introduction, as a preliminary operation.
Connecting an Android device to a Windows computer does not mean that, although recognized by the system, its memory is accessible. This happens because the USB connection of the device to the PC is not set in MTP mode. To verify that this connection method is active, after you have connected the phone to the PC via cable, check if there is a warning in the Notification Center of Android. Then swipe from top to bottom, near the top edge of your smartphone screen, and tap on it. Then select the MTP mode, to transfer and manage files through your computer.
Depending on the model of your Android device, a warning may also simply appear on the screen, to indicate whether you want to recharge the battery only or guarantee access to the internal memory. With the Android device in my possession (Huawei Mate 10 Pro), to access the configuration of the USB connection, you need to access the Settings of the device, through its icon with the symbol of a gear on the home screen. Then you have to select the items Device connection > USB and, from the options on the screen, choose Device file manager (MTP).

If your smartphone is not automatically recognized by Windows, you will need to download the drivers from the manufacturer's website. For example, if you own a device Samsung, you will need to download the Smart Switch application; the devices Huaweiinstead, they may require the installation of the HiSuite software to be recognized.
What I recommend in these cases is to reach the manufacturer's website and look inside it for the model of the device you own, in order to check for the presence of software to install on your computer. In addition, you can search on Google or any web search engine, indicating [make and model of your device] followed by the words USB Drivers o software update (for example, Huawei Mate 10 Pro USB Drivers). I recommend though, be sure to download drivers only from official sites and / or however from reputable sites, as the risk of downloading malware is quite high.
It should be emphasized that the software of smartphone manufacturers (Samsung Smart Switch, Huawei HiSuite etc.), in addition to allowing the recognition of the phones by the PC, also allow you to make backups of the latter, synchronize data with the computer and more. still. Having made this necessary premise, let's get back to us.
Now that your Android smartphone is set up correctly in the MTP mode and it has been recognized by Windows, you can access the files and folders in its memory. Then click on the icon File Explorer Windows (the symbol of a yellow folder, located in the taskbar) and select the item What PC from the left sidebar in the window that appeared on the screen.

In the box Devices and units, double-click the icon for your smartphone and access the section Internal Memory, to find yourself inside the device memory and then explore all the folders and files inside it. If you want more details on how to transfer photos and videos between Android phone and computer, I recommend that you read my guide on how to connect Android to PC.
MacOS
If you use a computer with an operating system instead MacOS, can connect the phone to the latter using the universal application Android File Transfer, available for free download via this link. This tool allows you to explore and transfer files between Android devices and Mac computers in a simple way, without requiring complicated procedures for linking them.
Then click on the link I gave you and select the button Download now, in order to download the Android File Transfer. By doing this, you have initiated the file transfer AndroidFileTransfer.dmg on your computer, after which you will have to double-click on it. In the window that appears on the screen, drag the program icon into the folder Applications and wait for the files to be transferred for installation.

Now, start the Launchpad, click on the icon of the application you just installed and then choose the button apri, to confirm its opening. Then click the button Start and connect your smartphone to your computer via USB cable. After a few seconds, an on-screen window will open allowing you to explore the files and folders on your device.

If you want to transfer files from your phone to your Mac, simply drag and drop files from the Android File Transfer to any folder on your computer. If you have problems identifying the smartphone via the application Android File Manager, I suggest you, in the same way as I indicated in the previous paragraph, to activate the MTP mode.
Also, check on the website of the manufacturer of your smartphone, if it is possible to download an official software for data synchronization, compatible with Mac. If you want to learn more about how to connect your Android smartphone to macOS, you can consult the my guide on how to connect Android to Mac.
Connect an iPhone to the computer
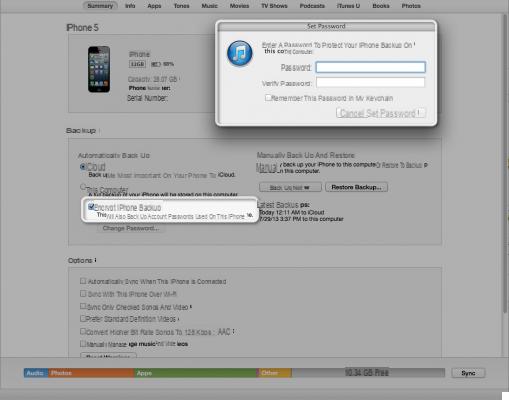
If you own a iPhone, you can connect it to your Windows computer by installing free official software iTunes. This allows you to synchronize data between Apple devices and your computer in a simple way, also being able to perform backup and restore operations.
Su Mac there is no need to download this software, as it is already pre-installed inside. On PCs with an operating system Windowsinstead, it must be downloaded via the official Apple website by clicking on the button 32bit download o 64bit download, based on the architecture of the PC in use. If you want to know if your computer is 64-bit or 32-bit, I suggest you read this guide of mine.
After downloading the file iTunesXXSetup.exe, start the installation by double clicking on it. Wait for the installation welcome screen to start and then click the button NEXT. Set the installation parameters, choosing the language, the destination folder and activating or deactivating the boxes related to creating a shortcut on the desktop, using iTunes as the default player for audio playback and automatic software update.

Then click the button Install and, in the window of User Account Control Windows, click the button Yes and then back to the button Yes, at the next request that is made to you. At the end of the installation process, close the window by clicking on the button end and, after starting the program, choose the item Accept.
So to connect your iPhone to your computer, be it a Windows PC or a Mac, use the cable lightning supplied and start up iTunes, in case it did not open automatically. Then click the button Continue on your computer and then tap on Authorize, on your iPhone display. You may also be asked to type the unlock code of the phone.

Thanks to iTunes, you can then transfer media files between iPhone and computer. In fact, you can synchronize music files, photos, videos and documents, so that you have them at your fingertips on your smartphone. You can also make a backup of individual files by exporting them from the iPhone to the hard disk of the computer. If you want to learn more about this topic, I suggest you read my guide on how to transfer files from iPhone to PC.
On Windows, you can access the contents of the iPhone memory, such as photos saved on the device, via File Explorer: I told you about it in my tutorial on how to import photos from iPhone to PC.
Connect a phone to the PC without a cable

If you don't have a cable for connect the phone to a PC, you can think of workarounds to accomplish this. You can, for example, take advantage of the systems of Cloud Storage for file transfer, which take advantage of the Internet connection. In this specific case, I recommend that you use services such as Google Drive, OneDrive o iCloud, just to name a few.
In general, however, the use of these services requires the use of the related apps, which are useful for uploading files to the cloud storage; By then accessing the website of the service you are using or installing its desktop application, you can view and download the previously transferred files to your computer. To learn more about this topic, I suggest you read my dedicated guides, in particular how to download Google Drive, how OneDrive works and how iCloud works. You can also read my general guide on the best cloud storage to use, to transfer files from one device to another.
As an alternative to cloud storage systems, you can also think about transferring files through sharing services. An example is Send Anywhere, which allows you to share files up to 10 GB in size. The files shared through this platform are placed inside a cloud storage, accessible only by means of a decryption key. After 48 hours from the upload, the file is deleted and therefore it is no longer possible to recover it. However, if you subscribe to a subscription plan ($ 5,99 per month), it is possible to extend the limits mentioned above. If you want to know more about this topic, I suggest you read my guides on how to transfer files from Android and how to transfer photos from iPhone, in which I mentioned the web service Send Anywhere.
If, on the other hand, you do not want to use the transfer systems that rely on the Internet connection, you can think of making the connection between the devices directly in wireless mode. In this regard, there are some tools and applications that you can use to achieve this goal, which I will talk about in the following paragraphs, dedicated to operating systems Android e iOS.
Android

If you want connect the Android smartphone to the computer, you can use the application AirDroid. This free app allows you to connect and manage many features of Android devices directly from the web interface. It is also possible to subscribe to a subscription plan at the cost of $ 1,99 per month or $ 19,99 per year, to extend the limitations of the free account. In fact, the free version allows for a maximum monthly transfer traffic of 200 MB, with a file size limit of no more than 30 MB.
To use this service, download the dedicated application available for free on the Android Play Store, press the button Install, Then Accept and finally on apri. After starting the application, tap the icon with the arrow symbol, which you find in the lower right corner, three times in a row and then tap the button Log in o sign up. Then register via social network or via email and password.
Now that you are logged in with an account, you can start using the service. Connect to the official website via the browser on your computer and log in with the same credentials used on your smartphone. If the two devices are connected to the same Wi-Fi network, they will connect automatically (otherwise you will have to use the remote connection mode, which is slower) and you can start using all the available features. You can also download desktop applications for Windows and macOS directly from the website.
In the case of file transfer, click on the icon Fillet to explore the folders in the internal memory of your Android device. To download a file, just right-click on it and choose the item Download from the context menu; to upload instead, click the buttons Upload file e Charge folder, which are located in the upper right corner of the File manager di AirDroid.

Don't have an Android smartphone? AirDroid is also available on devices with an operating system iOS, by downloading the free application directly from the App Store. Its operation is similar to the one I have indicated to you for Android devices.
iOS

using iTunes, which I told you about in a previous paragraph of this guide, you can activate the functionality of wireless connection between your iPhone and your computer. To activate this method of communication between the two devices, first connect your iPhone to the computer via cable lightning. Then start iTunes, if it didn't open automatically, and click theiPhone icon that you find at the top left.
Then select the tab Riepilogo, from the sidebar on the left of the interface iTunes, and scroll down the screen until you find the section options. Then activate the box Sync with iPhone via Wi-Fi and click sul pulsating Apply per confermare l'operazione.
Now you just need to disconnect the cable from the iPhone and the computer and connect the two devices to the same Wi-Fi network, to make them communicate with each other wirelessly. If you don't know how to do this, you can check out my guide on how to connect to Wi-Fi.
How to connect the phone to the computer


