Would you like to be able to edit dynamic videos from your mobile, and without taking too much time? It is possible, and in particular with Adobe Premiere Clip, which we announced the release in December 2015, and which we have used a few times since. Here is a short user guide.

A few weeks ago, while chatting with another web journalist, I learned of Adobe Premiere Clip, a video editing application for smartphones. Well, not really learned, since I obviously knew Adobe Premiere on a laptop, and I had heard about the release of this app on the Play Store, but I had never imagined that the tool could really be used on a smartphone. I imagined it more as a companion app, or some sort of editing tool, allowing you to slow down or apply an effect on video.
It's wrong. In fact, Adobe Premiere Clip is much more convenient than that. In particular, it allows you to create video clips directly from your smartphone, and save them and then publish them without a watermark spoiling everything. And if you have little time to mature your editing idea, Premiere Clip can even automatically edit the video for you.
Some prerequisites
- Try to record from short video shots (5 seconds maximum) easier to integrate during assembly. These short shots are also intended to facilitate Clip's artificial intelligence work.
- Own a smartphone very powerful. For this presentation, we used a Samsung Galaxy S6, which started to heat up violently, and whose battery melted 80 to 0% in about 2 hours. Yes, in two hours ... Not to mention the number of times the application crashed. Fortunately, the (local) backup is practically in real time, so that we do not lose any of our modifications.
- Don't consider editing your first feature film since Premiere Clip. Really a bad idea.
Free editor mode
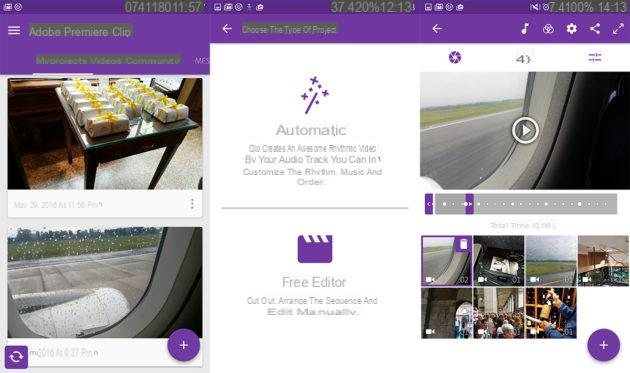
When you arrive on Adobe Premiere Clip, on the main “My projects” tab, and you want to create a new project, you must select the bubble representing a smartphone. You will then be asked to select the videos you want to import, but this is not very important since you will be able to recover them afterwards. This is when you are offered the type of project: Automatic or Free Editor.

In this mode, you can edit freely (that's the whole principle) and cut your shots as you see fit. You can retouch the exposure of shots, but also highlights and shadows. The same goes for the sound volume, which it is even possible to deactivate altogether. Adobe also offers to insert audio fades in or out or activate Smart Volume, which is responsible for equalizing the audio data. You can also slow down the track, to do slow-motion.
Finally, we can apply a filter to the image from the icon representing three interlocking circles.
Automatic mode
This is THE feature that interests us particularly since Premiere Clip offers to edit your videos directly. To do this, you also select the clips you want to integrate and Adobe will show you a small dynamic video and add a little music that “roughly” fits the action. You can choose between some music integrated in the application and titles from your personal library.

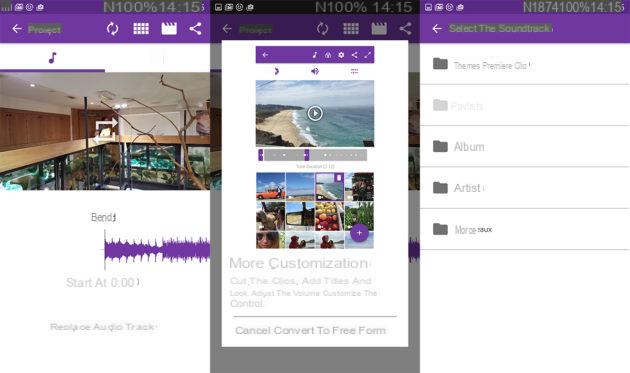
If the result is not to your liking, it is always possible to "convert to free format" by pressing the icon in the shape of a cinema clapperboard. And what is interesting here is thatwe keep the frame of the video as the app had imagined it. You are then free to lengthen the plans (Adobe tends to make them very, very short) or reorganize them (even if Adobe is rather good in this area).
Last little tip: if you find the choice of music too small, you can import songs from the internal memory of your mobile. It is accessed from the musical note icon, and by clicking on "replace". This opens a page with your music files.


